Michael Klein Audio Design Death Shroud Dual Delay+Boost & Reverb+Boost
- Unit price
- / per
Our gear experts are always happy to help you find the best gear for you and answer any questions.
All instruments are thoroughly inspected by our professional technicians before shipment.
Your details are protected and safe with us.
Michael Klein Audio Design Death Shroud Dual Delay+Boost & Reverb+Boost
- Unit price
- / per
From Michael Klein:
Death Shroud came about as the result of what I love about Lonely Ghost, but sometimes wish could be done differently with it. I had the idea of doing something similar, but with different voicings for the delay and reverb, and the ability to use each independently. As I kept working on it, I saw the advantages (for my personal use) of doing what turned into Death Shroud.
Like Lonely Ghost, the Death Shroud utilizes a DSP chip dedicated per effect side. Specifically, each delay and reverb have a dedicated Spin FV-1 controlled by a 24LC32A EEPROM. This maximizes the DSP power per effect, which gives the best sonic results. And on top of that, each EEPROM has three selectable modes (via the toggle switches).
Despite all the digital sorcery going on, your dry signal remains 100% analog and tonally transparent. Each effect is mixed back with the dry signal using an analog mixer, with noon being roughly a 50/50 mix.
I tacked on a slightly different volume control, as I wanted the ability to turn DOWN (what’s that?!) the volume of the effect for more ambient sounds. Don’t worry, there’s still plenty of boost available for each effect!
Controls
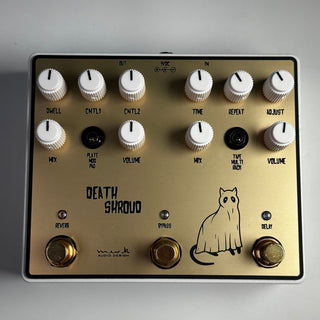
Note that each “side” has its own 3-way toggle switch. This changes the modes within each effect. Each side also has its own independent analog Mix and Volume controls, but we’ll get into that more below.
Delay
Modes
1. "TAPE" (toggle UP) - This mode's tone was inspired by the EP-3 Echoplex, but adapted for what I like about it. You'll notice a bit less regular modulation, a darker tone, and an overall more ambient and less "stadium" vibe than the RACK setting.
- TIME - Adjusts the delay length.
- REPEATS - Adjusts the number of repeats.
- ADJUST - The parameter of ADJUST changes per delay mode. In TAPE mode, ADJUST controls the age of the tape. This affects mainly the upper-frequency response of the delay line, but also affects the saturation of the repeats. I like this setting where it's sort of bright, but not necessarily neutral sounding, if you know what I mean. Usually about 1-2:00.
- MIX - Adjusts how loud the Delay line is compared to the dry signal. Fully counter-clockwise is 100% dry, fully clockwise is 100% wet. Note – the signal level going into Death Shroud will impact your preferred Mix settings. In the effects loop of an amp, you may prefer lower Mix settings compared to use in front of an amp.
- LEVEL - Controls the overall volume, with +6dB linear boost available if desired. Unity gain is usually around 11:00-12:00, but is dependent on many variables.
2. "MULTI" (toggle MIDDLE) - This mode was inspired by units like the Roland RE-201 Space Echo and Binson Echorec, which were capable of multiple delay lines resulting in somewhat rhythmic repeats. Its personality is similar to that of "TAPE" but with a little different voice beyond the multiple delay lines.
-
ADJUST - For the MULTI mode, ADJUST is simply a high frequency filter control.
3. "RACK" (toggle DOWN) - This mode's tone was inspired by the TC Electronic 2290 unit. Clear, pristine but with some of the warmth of vintage digital delay units. Like the 2290, this mode also allows the repeats to be modulated for a spacious, chorus-like tone.
- ADJUST - In the RACK setting, ADJUST varies the depth of modulation. If you don't want the delay line modulated, just turn it all the way down. I love to turn this up for the rich, complex tone of ‘80s rackmount units.
Reverb
Modes
1. "PLATE" (toggle UP) - this mode was largely inspired by the sounds of large plate reverbs used in studios. This effect has always reminded me a bit of a spring reverb without the “splash”, and a decay that I can only describe as “electric” sounding.
- DWELL - Adjusts how long the reverb decays out. the PLATE mode naturally has the shortest decay.
- CNTL1 - The parameter of CNTL1 (and CNTL2) changes per reverb mode. In PLATE, CNTL1 adjusts the pre-delay of the reverb. At minimum, there is no delay between the input signal and the beginning of the reverb. At maximum, there is a gap in timing between the input signal and the beginning of the reverb. Use this to control the “space”, as longer pre-delay lends itself toward a “larger” perceived environment.
- CNTL2 - For PLATE, CNTL2 serves as a dampening control on the reverb signal. At minimum, the reverb is brighter sounding with more treble content. At maximum the highs are softened. This control is very useful in setting the PLATE mode with whatever type of tone you’re using, be it a clean tone, something like VHI, or modern high gain leads.
- MIX - Adjusts how loud the reverb line is compared to the dry signal. Fully counterclockwise is 100% dry, fully clockwise is 100% wet. Note – the signal level going into Death Shroud will impact your preferred Mix settings. In the effects loop of an amp, you may prefer lower Mix settings compared to use in front of an amp.
- LEVEL - Controls the overall volume, with +6dB linear boost available if desired. Unity gain is usually around 11:00-12:00, but is dependent on many variable.
2. "MOD" (toggle MIDDLE) - this mode is very similar to the reverb from the STULL pedal that I first built for my buddy Sammy Duet. Like STULL, the MOD mode is a modulated reverb that works great with all types of tones, from clean through high-gain distortion. I chose this voicing for Death Shroud because it can also be used as a great ‘80s-style rackmount hall delay sound.
-
CNTL1 - In MOD, CNTL1 adjusts the modulation depth of the reverb. At minimum, there is minimal modulation of the reverb signal. I like to use this control to vary between a more traditional “hall” reverb (minimum) to the more prominent modulated reverb seen in STULL.
- CNTL2 - Similar to CNTL1, the CNTL2 adjust the modulation rate. At minimum, the rate is subtle. This again can help dial this mode in from something like a “hall” reverb that something more typical of STULL.
3. "PAD" (toggle down) - this mode is the hardest to describe as it combines different types of dynamics processing into a reverb...with the end goal being something that sounds like soft synth pads that tracks with your playing. I will warn you, it takes a bit of tweaking to get to work how I intended, but once you’re there I think you'll find it rewarding and inspiring.
Unlike the other modes, in PAD mode with the DWELL control maxed out - you will get true infinite decay. I want you to think about how to control that infinite decay and its interaction with your playing with CNTL1 and CNTL2....
...PAD mode has the unique ability to track your note or chord changes in real time and smoothly transition from one to the next. By setting the MIX control at maximum, the initial attack of the guitar is eliminated. By eliminating the note attack, providing endless sustain, and smooth transitioning from chord to chord...you have a very synth-like experience at your hands! I can’t help but think of virtuosos like Kevin Shields, Robert Fripp, and Bill Frisell who’ve used the guitar to create ambient soundscapes characteristic of their unique voices on the instrument.
Before we get started on PAD, humor me and crank MIX and DWELL controls to maximum! Trust me!
- CNTL1 - In PAD, CNTL1 controls how the sustained reverb transitions from one chord (or note) to the next one played. At minimum, the “first-played” reverb overlaps into the “second-played” reverb. This, to me, sounds smeared and somewhat unpleasant. At maximum, there is a notable “break” (for a lack of a better term) from the “first-played” reverb into the second. In between those two extremes, you will find a setting where the first reverb seamlessly transitions into the second, essentially eliminating initial note transients and creating a pad-like sound
- CNTL2 - CNTL2 is essentially a limiter on the reverb signal. To understand what’s happening, set the control to minimum. Here, your reverb transitions smoothly but you’ll notice the decay is quite loud compared to the initial “bloom” and sounds a bit untamed resultingly. At maximum, the infinite reverb decay is limited down, and its volume is resultingly quieter and more subdued. In between these extreme settings, you will find a setting where the reverb transitions smoothly (thanks to CNTL1)...and it’s infinite decay is natural in relationship to that initial transition.
NOTE – when using both delay and reverb, I usually recommend setting the VOLUME control of the Delay side at unity gain (the same volume engaged vs bypassed). You can then use the VOLUME control of the Reverb side to adjust your overall output volume.
Adding product to your cart
You may also like
Our gear experts are always happy to help you find the best gear for you and answer any questions.
All instruments are thoroughly inspected by our professional technicians before shipment.
Your details are protected and safe with us.


